I am a chronic manicure lover, like on a routinely schedule going about every 2-3 weeks to get my nails redone manicure lover. You know who is not a fan of this schedule? My wallet. </3 So, I decided to buy all of the necessities and start doing them at home to save myself some $$$! With a lot of trial and error, I have finally figured out the perfect combination to achieving the salon gel manicure look. In this post I am going to link my kit, lay out the process, and tell you all of the tips and absolutely do not do’s to giving yourself the perfect at home gel manicure!
THE KIT
The best part about this kit is that you basically get all of it for the price of one manicure.
Everything listed below is available to purchase on our storefront!
This is a MUST have to giving yourself a gel manicure. This little gadget is going to be what cures the polish onto your nail and makes it hard. The one I have linked does require a plug in and the cord is not super long, so maybe add an extension cord to your cart if you don’t already have one.
Polishes
There are three polishes that you need, the base coat, gel polish, and the top coat. We’ll dive into the best brands below.
The Prep
nail clipper, file, cuticle off, cuticle pusher, cuticle cutter, buffer
This part I completely skipped the first manicure I gave myself and you could totally tell. To put it bluntly, they were so ugly looking that I ripped them off and drove to Sally’s the next day to purchase all of the prep. I’ll dive into the nitty gritty of what makes all of this so important below in the next section.
the process
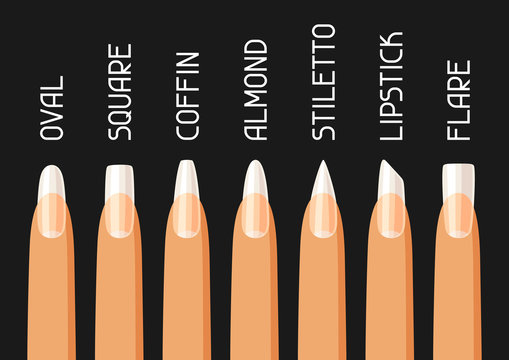
shape your nails
Clip & File
This sounds so much easier than it actually is and it truly only gets better with time and practice. I have found that it helps to have a picture of the style you want as you’re trying to shape your nails next to you so you have something to match them to. If you are trying to tackle a new style of nail that you’ve never done before, I would suggest watching a quick youtube video before because they always have tips and tricks to make sure you’re successful at getting what you want.
read the back of your cuticle off bottle and make sure to follow the directions because there are harsh chemicals in it
This is one of the most important steps of the entire process. If you do not clean up your cuticles, there are a plethora of problems that you will run into. Your nail polish will pool over the cuticle and onto your skin, giving it a clumpy and sloppy look. It is also not safe to cure polish onto your skin, it can cause severe allergic reactions or get stuck on your skin which is painful to peel off. When you cure your polish over your cuticle, the polish actually starts to peel off because it is a more elevated surface which will cause your polish to constantly be getting stuck on things like your clothing and in your hair when you’re shampooing and then if will start to actually rip off.
Nails w/o cuticle clean up… ew.
Paint your nails
buff & polish
MAKE SURE TO CURE EACH HAND AFTER IT IS PAINTED FOR 60-90 SECONDS
Before you start to polish your nails you NEED to buff your nails until they feel nice and smooth! This is one of the important steps I skipped the first time I gave myself a manicure and my nails came out looking incredibly uneven and chunky. Afer your nails are butter smooth, you can dive into your polishes.
Start off with one thin layer of your base coat. This is going to act as a ‘track’ for the rest of the layers. If you get any on your skin, make sure to wipe it off. The same applies for the rest of the layers you apply!
After the base, you’re going to move onto your gel polish. The number of layers is going to depend on the color of the polish. I have found that “milky” and light colors take at least three layers where the rest you can settle with two. Again, make sure you cure after each layer of polish you apply. If you do happen to cure polish onto your skin or outside of your nail, after you have cured it you can go back in with your nail file and gently reshape them. Don’t go too crazy, go in with a light hand or you will take off all of the polish and you will have to redo it.
If you’re a chrome girl, you are going to want to apply a thin layer after your last layer of your color gel polish. You do not need to cure after your apply your chrome, just go straight to the top coat!
Finish off with one thin layer of your base coat and cure for a final time. On the final cure I always do 90 seconds just to be safe.
Final Touches
To make sure your hands and cuticles don’t dry out and crack, always moisturize afterwards! You can definitely use the cute little cuticle oil as they do at the nail salon but if you lean towards the more natural side, castor oil works just as well! Last but not least, apply whatever hand lotion you like best and, vwala! Your nails are now hot.
More simplified step by step for you to screen shot & look back on below <3
www.whatsfresh.blog
in short
1. Cut and file nails to desired shape.
2. Clean up your cuticles: cuticle off, wash hands, push them back, cut them off.
3. Buff nails to smooth them down.
4. Base coat, top coat x 2-3, chrome if desired, top coat.
5. Cuticle oil & hand lotion.
TIPS & TRICKS
Make sure to apply THIN layers of your polish. If you pile them on too thick, the heat of the UV lamp transfers through and it will burn like a b*tch.
The brand of gel you use matters, DO not cheap out. My favorite so far is the beetles brand. Sally’s does not sell this brand so I always go through amazon for my polish.
speaking of polish… beetles does sell a variety of different packs, the more in a pack the more money you save. (6, 10, 20, ect)
You can also purchase an entire kit from beetles too instead of purchasing everything separately which will save you money.
DO NOT DO NOT DO NOT DO NOT paint your nails in direct sunlight. This will cause the polish to start to cure on the nail as you are painting which makes the polish bumpy and uneven. the polish will also cure to the brush, making it impossible to use and basically ruins the whole bottle.
Again, all of this is linked to our storefront so if you’re interested in purchasing click the button below & tag @whatsfresh.blog in your hottie at home manicure pics!!


One Comment
Comments are closed.